
Note: This article was first published on 9/11/2017. It has been updated to reflect changes working with Web AppBuilder version 2.8.
I’ve recently had the opportunity to develop a few web map apps using Esri’s Web AppBuilder (Developer Edition) platform. It’s essentially a HTML5/JavaScript container that displays a web map and various widgets in a standard layout. The Developer Edition allows you to create custom themes and add custom widgets, features that are not available in the cloud-hosted version of the product. For the Developer Edition, you install the product on your computer’s local hard-drive, develop the app, export it as a zipped file, extract, and place on your web server.

As my organization was developing these apps, we realized several work-arounds were required to add or remove functionality. Our solutions were mostly CSS “hacks.” I wanted to share a few of these solutions in this post.
Note: The exact style rules may be different from app to app. I also pull the default styles from the style tag in the index.html file into a separate style.css file, which is where I add my custom rules. I’ve also discovered that when upgrading to a newer version of Web AppBuilder, sometimes your CSS rules need to be updated as well.
Disabling the Filter Feature from the Attribute Table Widget
By default, the Attribute Table Widget provides a Filter tool that allows user to perform queries against the layers. And while this normally isn’t an issue, when we were migrating our Property Mapper from FlexViewer to Web AppBuilder, we were required to disable this, as it would allow the public to search for property owners by name.

After a support call with Esri, we learned there was not a way to remove this tool. However, I was able to add a CSS rule to hide button that opens the Filter tool. Unless Esri has added the explicit option to disable this tool, I think the following CSS rule is your best option. And while a skilled developer could figure out how to unhide the button, they can also probably figure out how to get the REST endpoint of the service – so you’re not really stopping them.
The trick relies on CSS attribute selectors. This allows us to match an element based upon the value of an attribute. We’re looking for elements with an aria-label of “Filter”.
/* hide Filter button for attribute table */
/* #dijit_MenuItem_[x] matches the element linked to the layer
you want to hide the filter button for.  You may or may not need this.
I believe using the attribute selector will work on its own */
#dijit_MenuItem_5,
tr[aria-label="Filter"],
tr[aria-label="Filter "] {
    display: none !important;
}
Here’s a screenshot from the app with this rule in action:

Showing Multiple Fields in Results for Search Widget
The Search widget is one of my favorite features of Web AppBuilder. This is a control that allows users to search for addresses (using a geocode service) or features within a layer. A few of our apps allow users to search for addresses against our tax parcels service. There are some addresses that occur within multiple communities. The problem is that by default, results only show the value from a single field. This would result in multiple suggestions that appeared the same (but in fact were for different communities). After asking a question on GeoNet, I learned that you can modify some Search widget files to allow multiple fields to appear for suggested results.

There are two files you need to edit to get this to work:
- The Search widget config file: [app]/configs/Search/config_Search.json (the json file may have a slightly different name)
- The Search widget Widget.js file: [app]/widgets/Search/Widget.js
In the config_Search.json, file you add a key called suggestionTemplate to whatever searches you want to enable multiple fields in the suggestions. You use the format of ${Field Name}. Below is a sample:
{
  "allPlaceholder": "Property Search",
  "showInfoWindowOnSelect": true,
  "sources": [
    {
      "layerId": null,
      "url": "https://[domain]/arcgis/rest/services/Layer/Name/MapServer/0",
      "name": "Property Address",
      "placeholder": "310 Allen Road",
      "searchFields": [
        "SITUS"
      ],
      "displayField": "SITUS",
      "suggestionTemplate": "${SITUS}, ${MUNI_NAME}",
      "exactMatch": false,
      "searchInCurrentMapExtent": false,
      "zoomScale": 50000,
      "maxSuggestions": 8,
      "maxResults": 8,
      "type": "query"
    },
    {[other search]
    }
  ]
}
In the Widget.js file, you need to search for “var convertedSource”, which may be around line 299. Within that object, you add a the following property: suggestionTemplate: source.suggestionTemplate || “”. Below is a code sample:
var convertedSource = {
   featureLayer: flayer,
   outFields: ["*"],
   searchFields: fNames,
   displayField: source.displayField || "",
   exactMatch: !!source.exactMatch,
   name: jimuUtils.stripHTML(source.name || ""),
   placeholder: jimuUtils.stripHTML(source.placeholder || ""),
   maxSuggestions: source.maxSuggestions || 6,
   maxResults: source.maxResults || 6,
   zoomScale: source.zoomScale || 50000,
   infoTemplate: template,
   useMapExtent: !!source.searchInCurrentMapExtent,
   _featureLayerId: source.layerId,
   // allow suggestions to include multiple fields
   suggestionTemplate: source.suggestionTemplate || ""
};
Adding a Divider for the Header/Navigation Links
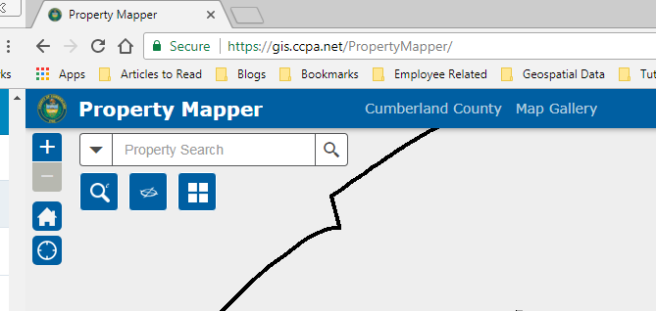
When developing a Web AppBuilder app, you can provide links within the header/navigation area of the page. But the drawback is there is no separator if you have multiple links. In the image below, “Cumberland County” and “Map Gallery” are separate links, but unless you mouse-over them, you’ll probably think is a single link named “Cumberland County Map Gallery”.
I found this simply annoying. However, I was able to add a pipe character to visually separator the links using the ::after selector. And because I only wanted the separator after the first link, I also used the :first-child selector. I also added a hover/focus pseudo-class to the links with a transition. What can I say, I’m a sucker for changing things on the hover/focus event and love transitions.

Below is the code I used to achieve his effect.
/* Header Link to Map Gallery */
/* Add a transition on the color */
a.jimu-link.jimu-align-leading.jimu-leading-margin1 {
    -webkit-transition: color 0.3s ease-in-out;
    -moz-transition: color 0.3s ease-in-out;
    -ms-transition: color 0.3s ease-in-out;
    transition: color 0.3s ease-in-out;
}

/* Add a pipe character after the first link to create a visible separator between links */
a.jimu-link.jimu-align-leading.jimu-leading-margin1:first-child::after {
    content: " |";
    color: rgba(255, 255, 255, 0.7);
}

/* change the color of the links on hover and focus events */<span id="mce_SELREST_start" style="overflow:hidden;line-height:0;"></span>
a.jimu-link.jimu-align-leading.jimu-leading-margin1:hover,
a.jimu-link.jimu-align-leading.jimu-leading-margin1:focus {
    color: #000;
}
Having Layer List Widget Open and Expanded on Page Load
One of my projects included migrating a FlexViewer app for our Public Safety office to WebApp Builder. This should increase the reach of this app, as first responders will no longer be limited to desktop browsers and flash-enabled devices. This app had a window open on page load that allows the user to toggle layers on/off. All the layers on this app are sub-layers within a single service. As you will see in the series of images below, it took a few CSS rules to achieve the same effect in Web AppBuilder. The solution involved changing the initial display properties for a couple elements.
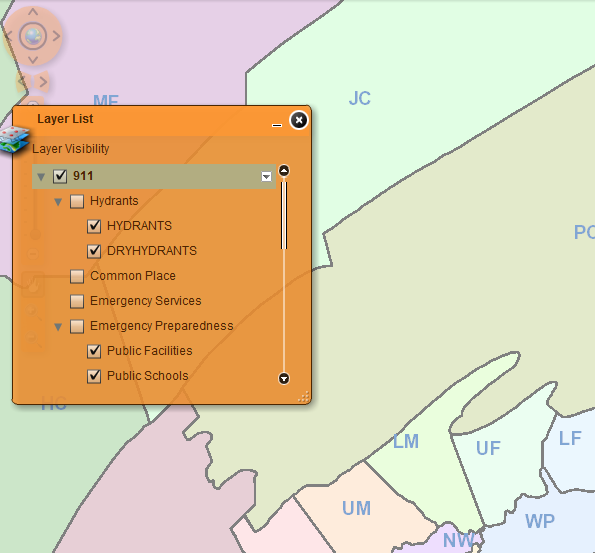


And now the code that made it happen:
/* Layer list expanded by default */
.jimu-widget-layerList table.layer-sub-node {
    display: table;
}

/* layer list legend hidden so it loads properly */
.jimu-widget-layerList table.layer-sub-node .legends-loading-img {
    display: none;
}
Summary
So there are a few examples of CSS work-arounds (and a JavaScript trick) I’ve implemented with Esri’s Web AppBuilder. Some others included:
- adding a black box around a legend element with a white symbol to seperate it from the white background of the legend widget (See Ag Resources map)
- adding print media queries so a user can print the map with the pop-up box open on the selected feature (this is not supported in the default print widget) (See Property Mapper)
- adding custom colors for standard/hover/disabled states for map buttons
Have you been working with the the Web AppBuilder product and had to find work-around solutions? Or maybe you’re a JS API guru and solved the problems that way? I would love to hear about it.

what file did you modify to get the fully expanded layer list to work like that. I am wanting the same functionality
LikeLike
I just added some CSS styles. I create a style.css file in the app’s root directory, and then link to the stylesheet in the head element of the index.html file. But there is also a generic style tag within the index.html file.
LikeLike
Can you explain how I can change where my legend widget shows, I want it to display on the lower right of my web map app (yes using Web AppBuilder) and just can’t figure out the CSS hack on it. Thanks in advance! Kate
LikeLike
Let’s connect over email. There are some questions I have, which will help me to help you. I’m at pmckinney[at]ccpa.net.
LikeLike